Tag Archives: Instructions

Popsicle Invite with Download

3 Jul

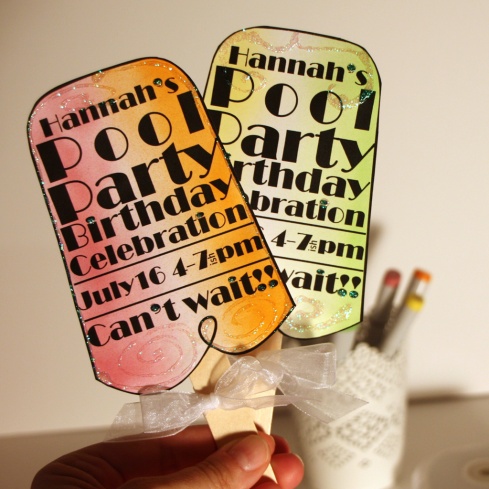
Ahhh, summer. It’s days of freedom, running barefoot along the beach, eating popsicles and having pool parties. Today, I’ve posted this darling Popsicle invitation over at CutCardStock.com.

070313-pair

Head over there to check out the instructions. Then come back here to download the popsicle shape (below). Your version will have the title “Pool Party Birthday Celebration” and room for when and where on the front. The back has “RSVP” with space to let your guests know who to contact and how to get to the party.

Enjoy the hot, hot summer! Eli

Download the Invitation here: pool party invite!

Silhouetted Album for B-A-B-Y (and Grad too)

23 May

Today over at CutCardStock.com, I shared a tutorial of how to create this darling BABY album:

Image

You can download a template to cut out the chipboard pages for Baby, Grad and Love. Click below for the download. Be sure to also check out CutCardStock‘s awesome Kraft Chipboard. It is seriously my favorite.

052313-love

(after you upload, press the back button to come back to the post)

BABY printable

GRAD printable

LOVE printable

Thanks for stopping by today. I hope will try one of these albums. I have to say, it might just be a new addiction. If you have some other words you’d like me to put up, just let me know and I’m happy to share.

Cheers, Eli

Topiary for Mom

6 May

Since Mother’s Day is this sunday, it’s time to grab a foam ball, some strips of stamped paper, glue, pins and your creative spirit to make a topiary for your dinner table or just for a decoration for mom. Here it is:

Image

If you want all the details on how to make it, please venture over to Cut Card Stock blog and check it out.

Image

Happy Mother’s Day!!

Eli

Bargello styled cards

30 Apr

Ciao, Bella! Hello Beautiful!

Bargello is a style of needlework originating from Italy. The quilters stole it and so have paper crafters. I have wanted to try it for a while and I finally got around to it.

For instructions, check out my post at CutCardStock.com .

(But be careful, it’s an addicting way to use up scraps.)

Until next time…keep crafting.

Copic Colors Notebook Tutorial

2 Jan

Ever get tired of trying to remember what Copic Markers you have at home? I do!! I created a Copic Color Notebook and you can too. For all the instructions, join me over at CutCardStock.com.

First, download the color chart that I created, here: Copic Colors chart 2012!

Happy, creative, fabulous new year to you all!!

Eli

Retro Recycled “wReath”

31 Oct

What fun this was to create.

Wander over to CutCardStock to read the instructions and check out the supply list. Have a Happy Halloween!!

Paper Chandelier is a beauty

15 Oct

Hey everyone, just wanted to drop in and let you know that I’m back designing for Cut Card Stock. This is a fabulous site to purchase great card stock for any kind of craft project. Here is the project I uploaded over there today:

To learn how to make one of your own, click for their blog! Just to wet your whistle, here is a full supply list.

Important Stuff
Paper Sweet Tooth Muscletone POP-TONE 140 lb, Basis White 70 lb (CutCardStock.com)
Embellishments Felt Flowers (Michael’s), Iridescent Gold Glimmer Mist (Tattered Angels)
Adhesives Gem-Tac (Beacon Adhesives), Glue Dots (Glue Dots Intl.)

Other Stuff Gems, beads, fishing line

Spring Fling goodie box Tutorial

17 Jan

I have had so much fun working with CutCardStock.com papers. Today, after enduring very cold days and snow last week, my mind turned towards Spring and Easter…I got this darling bunny image from Hambo Stamps (a digital stamp).

I couldn’t resist using it on a cute goodie box.

Instructions/Tutorial

  • Print image and color with Copic Sketch Markers
  • Cut S4-127 Classic Scalloped Squares LG. Use a score tool and score in a square from the divot between the first and second scallops on each side. Then score each corner on the diagonal.
  • Snip on the diagonal of each corner and fold on the score lines so that all the scallops point up. Then cut two contrasting pieces of cardstock at 4×5½”
  • Lay one piece of the just cut cardstock onto your score tool. Mark the left edge at 1/8″ and move it to ¾” line while leaving the bottom corner at the left edge. Score.
  • Flip over the piece and score the other side. Fold both edges in. Complete the scoring and folding with the other rectangles.
  • Add super sticky double-sided tape to the edges of the scalloped square.
  • Add the rectangles to the tape.
  • Add super sticky double-sided tape to the left edge of each of the rectangles as seen above. Remove the protective cover from one piece of tape, bring two sides together and secure. Complete the other three junctions.
  • Using purple cardstock cut S4-239 Classic Scalloped Borderabilities® Petite. After cutting the first time, use the inverted top scalloped edge to cut another strip. Do this three more times and then cut the four strips apart.
  • Glue the ends together. Add the strips to the top of the goodie box, allowing it to encircle the top rim. Trim as needed to match scallops.
  • Cut/emboss S4-235 Fancy Tags from orange cardstock. Add stickers and brads and glue to the box.
  • After coloring the image, cut/emboss with S4-161 Labels One, a size that fits the majority of the image with some parts sticking out. Use some low tack tape to keep the image from moving. Any part that overlaps the edge, cut on either side and pull the part above the die. Then cut in the Wizard.
  • To create a mat for the stamped image, cut/emboss purple cardstock S4-161 Labels One, one size larger than the die-cut stamp.
  • On the back side of the stamped image, place a bamboo skewer and use 3D adhesives to hold it in.  Place the mat onto the back side.
  • Add some crumpled paper on the bottom of the goodie box. Layer a coffee filter on top and place the bunny sign down into the filter and paper. Fill the filter with goodies and display for a happy treat center.

Important Stuff
Paper
Basis 80# cardstock in Purple, Orange, Aqua, Cryogen White (CutCardStock.com)
Stamp Spring Bunnies digital stamp (Hambo Stamps)
Tools S4-127 Classic Scalloped Squares LG, S4-239 Classic Scalloped Borderabilities® Petite, S4-161 Labels One (Spellbinders)
Adhesives Glue Dots (Glue Dots.com), 3D Squares (SCRAPBOOK ADHESIVES by 3L), Terrifically Tacky Tape (Provo Craft)


Beauty layout with Instructions

7 Jan

I’ve had this photo printed for a while and it has been waiting for the day I could scrapbook it. Well, that day finally came.

The photo draws me in and I wanted to find a quote to bring it alive. Sometimes my own words simply don’t capture what I’m trying to say so I look to someone else. Usually I jump over to Quote Garden which is  fabulous for finding quotes on a hoard of themes.

In order to ensure this photo would stand out, I wanted to use a black metallic paper. This one happens to be from CutCardStock.com. It is a piece of 12×12″ cardstock from the Stardream Metallics line, called Onyx. All 12×12″ papers are discounted this month at CutCardStock.com so definitely go check out the site.

I also wanted to use a technique that would bring out the distinctive beauty of this paper. I decided to score the entire page to make it appear quilted.

Here is how you can do it too.

Using your favorite scoring tool, rotate the page “on point” and place at 8½”, one on the vertical and one on the horizontal.

Score place your score tool into the groove at 8½” and then run it down to the bottom of the platform. Repeat by one inch increments on either side. Because of the page size, you will not be able to complete the full score lines. I recommend pulling the paper up beyond the top ruler and carefully continue to score.

If needed rotate the page 180° to complete the first set of diagonal lines. Then turn the page 90°  and employ the same process for a finished page.

Feel free to use this side or, turn it over, as I did, for a slightly different look.

Trim  your photo to 4×5-½”. Also trim a mat from Curious Metallics Bloom. Punch the corners of both.

Create page embellishments by die cutting/embossing S5-012 Classic Frame (2 times from Stardream Metallics Opal), and S7-017 On the Vine Border Grand (once from Stardream Metallics Opal and once from Curious Metallics Bloom). Keep the inside of the frames for later use.

{Doesn’t that embossing look amazing!}

Trim the leaves off of the Bloom colored Vine and then trim to make the vine smooth.

Create the title block by adding letter stickers to the Opal block leftover from cutting the frame. Write the rest of the quote onto a chipboard tag and add it to the bottom of the block.
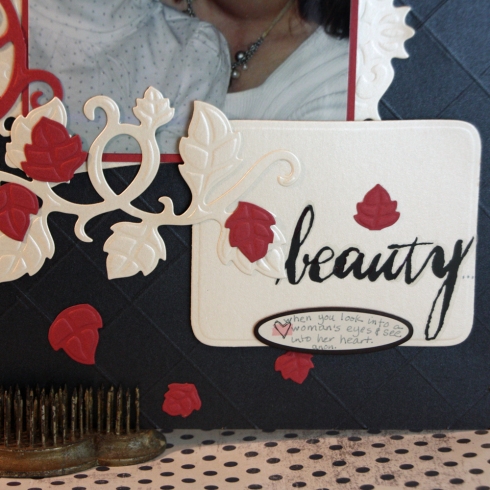
Assemble the photo frame by layering the two frames so that the pieces create a heart shape where they come together.

Then add the photo and mat.

Assemble the page as shown and enjoy for years to come.

Important Stuff
Papers Stardream Metallics 105# cover stock in Onyx and Opal, Curious Metallics Berry (CutCardStock.com) (Don’t forget, all of CutCardStock’s 12×12 papers are on sale this month, January 2011)
Tools S5-012 Classic Frame, S7-017 On the Vine Border Grand, Wizard™ (Spellbinders™); Martha Stewart Crafts™ Paper Scorer (EK Success)
Embellishments Heidi Grace Designs Chipboard tag (Fiskars), 0.3 Gray Multiliner pen (Copic)
Adhesives 3D Adhesive squares (SCRAPBOOK ADHESIVES by 3L)

Other Stuff Letter stickers, corner rounder punch, PVA glue

Gift Card Holder–Tutorial

6 Dec

‘Tis the Season…for giving!

Gift cards can be a wonderful way to treat a special someone to something they can choose. Make sure to add a personal touch by giving it in a lovely gift holder. This one reflects the classic colors of the season.

and the side view…

This may look complicated, but following the simple step-by-step instructions below, beginners and pros alike, can create this pretty little card.

First gather your favorite cardstocks–I love to use metallic, especially during the holidays. These Stardream colors, Mars, Emerald and Coral are all from CutCardStock.com. (Check them out for fantastic products, great prices and frequent sales)!–Then grab a trimmer, some adhesive, wintery die cuts/cutting system, ribbon, etc.

Instructions:

  • Trim Coral Cardstock at 4½x9½”
  • Score Coral rectangle to prepare it for “valley folds” at 2″, 4″, 6½” {To help me figure this out, I made a pattern from brown cardstock. Now I can tuck it away in my “patterns” folder to refer to later…}
    (To better see the score lines, click on the photo to enlarge)

    Turn over and score for “Mountain Folds” at 3 and 8¾”

    Fold along score lines as shown:
  • Trim two mats from Emerald Cardstock: 2×3½ and 2½x3½ and punch the corners with a small radius punch
  • Trim a strip of Emerald: 3/8×9″ and then cut in half to 4½” wide
  • Cut/emboss S4-224 Snowflake Borderabilities® Petite die template from Emerald to get at least 3 snowflakes.
  • Cut/emboss S4-224 Snowflake Borderabilities® Petite from Mars cardstock. Trim the border to 4½” long and 2½” wide. Keep the snowflakes and the scrap that came from the decorative edge.
  • Adhere the trimmed border to the small flap at the end of the Coral strip.
  • Flip the card over so that the large border is on the left and adhere the extra border piece near the fold on the right of the first panel.
  • To make a pocket for the gift card, cut a slit in the fold so the gift card will slip into it, add super sticky tape (with thin width) near the fold below the card slit. Press the folds together.
  • Embellish the card by adding the Emerald rectangles, strip and snowflakes along with red snowflakes.

Supplies
Papers Mars, Emerald, Coral Stardream Metallics (CutCardStock.com)
Tools S4-224 Snowflake Borderabilities® Petite, Wizard (Spellbinders Paper Arts), Guillotine Trimmer (Tonic), Corner Rounder Punch (EK Success)
Embellishments Organza ribbon (Michael’s), Teriffically Tacky Tape (Provo Craft)

Other Score tool, PVA glue,