Tag Archives: Layout

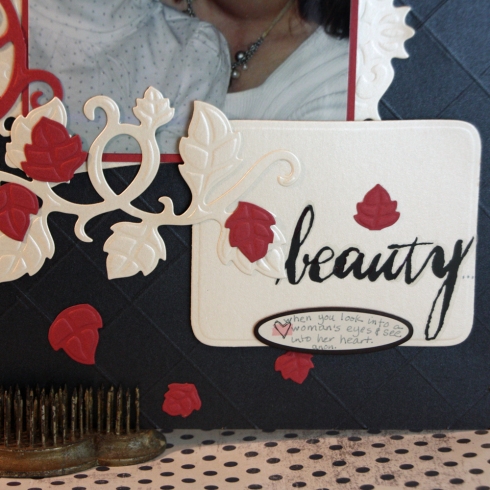
Beauty layout with Instructions

7 Jan

I’ve had this photo printed for a while and it has been waiting for the day I could scrapbook it. Well, that day finally came.

The photo draws me in and I wanted to find a quote to bring it alive. Sometimes my own words simply don’t capture what I’m trying to say so I look to someone else. Usually I jump over to Quote Garden which is  fabulous for finding quotes on a hoard of themes.

In order to ensure this photo would stand out, I wanted to use a black metallic paper. This one happens to be from CutCardStock.com. It is a piece of 12×12″ cardstock from the Stardream Metallics line, called Onyx. All 12×12″ papers are discounted this month at CutCardStock.com so definitely go check out the site.

I also wanted to use a technique that would bring out the distinctive beauty of this paper. I decided to score the entire page to make it appear quilted.

Here is how you can do it too.

Using your favorite scoring tool, rotate the page “on point” and place at 8½”, one on the vertical and one on the horizontal.

Score place your score tool into the groove at 8½” and then run it down to the bottom of the platform. Repeat by one inch increments on either side. Because of the page size, you will not be able to complete the full score lines. I recommend pulling the paper up beyond the top ruler and carefully continue to score.

If needed rotate the page 180° to complete the first set of diagonal lines. Then turn the page 90°  and employ the same process for a finished page.

Feel free to use this side or, turn it over, as I did, for a slightly different look.

Trim  your photo to 4×5-½”. Also trim a mat from Curious Metallics Bloom. Punch the corners of both.

Create page embellishments by die cutting/embossing S5-012 Classic Frame (2 times from Stardream Metallics Opal), and S7-017 On the Vine Border Grand (once from Stardream Metallics Opal and once from Curious Metallics Bloom). Keep the inside of the frames for later use.

{Doesn’t that embossing look amazing!}

Trim the leaves off of the Bloom colored Vine and then trim to make the vine smooth.

Create the title block by adding letter stickers to the Opal block leftover from cutting the frame. Write the rest of the quote onto a chipboard tag and add it to the bottom of the block.

Assemble the photo frame by layering the two frames so that the pieces create a heart shape where they come together.

Then add the photo and mat.

Assemble the page as shown and enjoy for years to come.

Important Stuff
Papers Stardream Metallics 105# cover stock in Onyx and Opal, Curious Metallics Berry (CutCardStock.com) (Don’t forget, all of CutCardStock’s 12×12 papers are on sale this month, January 2011)
Tools S5-012 Classic Frame, S7-017 On the Vine Border Grand, Wizard™ (Spellbinders™); Martha Stewart Crafts™ Paper Scorer (EK Success)
Embellishments Heidi Grace Designs Chipboard tag (Fiskars), 0.3 Gray Multiliner pen (Copic)
Adhesives 3D Adhesive squares (SCRAPBOOK ADHESIVES by 3L)

Other Stuff Letter stickers, corner rounder punch, PVA glue

Treasure Hunt (Pink Elephant Challenge)

29 May

More birthday pages. I will catch up on my cutie pie’s birthday album. Guess I’m not too far since I have several months before she 11.

Inspiration comes from many sources for me right now but mostly…challenge blogs. Today I jumped on over the The Pink Elephant and took up their Theme Challenge for scrapbooking: Summer.

What a perfect time to work on the birthday pages since we have a July birthday in our house. A pool party was the best a couple of years ago…one of the games the kids played was a treasure hunt for coins that we threw in…so I took three pics that showed off that game. Check it out.

I kept the layout fairly simple and clean. The swimsuits have so much color and there’s lots to see in all the pics. so I felt it accomplished what I wanted. Those smiles tend to stand on their own.

Hope you enjoy the beginning of summer and thanks for letting me share.

Important Stuff
Paper “Sisters” Solid/Lime cardstock (My Mind’s Eye), Medium Hawaiian Blue cardstock (WorldWin)
Stamps Crown Frame, Swirl Stamp (Prickley Pear Rubber Stamp)
Ink Memento Tuxedo Black dye ink (Tsukineko)
Embellishments Turquoise brads (Creative Impressions), Heidi Grace punch board number and tags (Fiskars)
Tool Corner Chomper (We R Memory Keepers)

Other Stuff Red cardstock, Glitter glue

One more look, close-up this time…

Cheers, Eli

Day Four: PPRS Release Hop

21 May

I’m baaaaaack for the fourth day of Prickley Pear Rubber Stamps‘ release of new Clearly Beautiful Stamps and coordinating Dies. Today features the Butterflies Stamp set and the Butterfly Die Cut. PPRS is offering a some great prizes for this little hop: Each day of the hop, someone will win the set featured along with other PPRS products worth $50!!! WHy not start at the Prickley Pear Rubber Stamp Blog and leave a comment there to be entered for one chance. Then leave a comment here for another chance.

Just remember, you also have until midnight tonight to leave a comment for Anya, Jennifer and at PPRS Blog for chances to win the Build an Owl set released yesterday.

If you’ve been following the new releases you saw the Build a Bird, Hibiscus and Build an Owl new releases as well.

Which one is your favorite? I think my favorite is the butterfly. I have so many project ideas…

I wanted to start with a layout and I’m so far behind with my daughter’s birthday pages (I have a scrapbook of all her birthdays) that I thought surely there would be some pics that would be fun with the butterflies. Perusing through my pics, I found some of my girl, with her new Heelys on…boy can she FLY with those things on…a page was born!

Instructions

  1. Create two butterfly embellishments: Die cut the butterfly from coordinating papers. You’ll need five butterflies. Stamp three of them with the text stamp and emboss with clear embossing powder.
  2. Layer two pairs of butterflies with stamped image on top, using dimensional adhesive. Add a mini button and a small bit of decorative thread, knotted at the center.
  3. Use the third stamped butterfly to create a journaling tag, adding chipboard stickers, other embellishments and journaling.
  4. Construct the layout by trimming patterned paper and adding it to coordinating cardstock.
  5. Print photos, mat them (I hand trimmed them to match the circles on the patterned paper) and add to the layout.
  6. Print title and trim. Stamp a flowered butterfly directly onto the title block. Stamp the antennas. Color with markers and add some glitter accents.
  7. Add it to the layout and attach the butterfly embellishments.
  8. Create a date block using rub-ons and add it to the layout as a final touch.

Important Stuff
Stamps Clearly Beautiful-Butterflies (Prickley Pear Rubber Stamps)
Die Cut Butterfly (Prickley Pear Rubber Stamps)
Inks Top Boss Watermark Ink, Moss Green pigment ink (ClearSnap)
Papers DoubleMates Plum cardstock (WorldWin), Swirl patterned paper (K&Co.), Spring Fling dotted circles and light pink papers (Making Memories)
Embellishments Specialty thread (Kreinik), Heidi Grace Designs Punchboard stickers (Fiskars), Tattoos rub-ons (KI Memories)

Other Stuff: Orchid cardstock, Clear embossing powder, Acrylic stamping block

JustRite Stampers Mega March Blog Hop

23 Mar

When I first saw the Stitched with Love Borders and Centers Round 2-3/8″ by JustRite…I knew I had to have it. I’ve been sewing nearly as long as I have been putting special things into scrapbooks…let’s say thirty some years. So this set fit right into my creative hands.

My challenge for this post was to limit the number of things I knew I could create with the set. (*sigh*) But my feature project came into clear focus a week or so ago when I decided to get back to an old tradition~making my daughter’s Easter dress. Then, she said she was ready to learn to sew and this layout was born. (The dress isn’t quite finished yet…)

Let me tell you a few simple instruction on how to create the elements on this layout. I made the half circle embellishments first. Not tricky at all, once you know what to do. First, begin by picking some pigment ink. I chose  silver. Load up your stamp with plenty of ink and impress the image onto colored paper. Add ultra-fine detail embossing power, shake off any excess powder and heat to set. Repeat two more times.

Then die cut use Spellbinders S4-114 Classic Circles SM, #4 (counting #1 at the center.)  Then cut them in half, using a paper trimmer…like this:

Cut/emboss S4- Labels Four, #6. Stamp with “Love” heart in brown dye ink, color with Copic markers and add journaling.

For the title, stamp the “Stitched together with Love” sentiment onto colored paper using pigment ink. Heat emboss using clear ultra-fine embossing powder. Color the spool with Copic markers. Cut/emboss using Spellbinders™ S4-137 Classic Scalloped Hearts. Add dotted outline.

Stamp the flowered heart with the ric-rac border onto colored paper. Color with Copics. Die cut with Spellbinders™ S4-114 Classic Circles SM, #4.

Put the layout together by placing the matted photos in an attractive grouping near the center and sprinkle the half circles around to support the feel. Add the die cut/stamped elements to finish it off. Stunning!

Thanks again for visiting. I hope it has inspired you to create something using JustRite’s Stitched with Love Borders and Centers Round 2-3/8″ .

Important Stuff:
Stamps: Stitched with Love, 2-3/8″ round stamper (JustRite Stampers)
Die Cutting: S4-114 Standard Circles LG, S4-137 Classic Scalloped Hearts, S4-190 Labels Four, Wizard™ (Spellbinders™)
Paper: Maggie May “Sophie Anne”, Feelin’ Groovy “Pure Joy” (My Mind’s Eye); ColorMates Dark Pretty Pink, Dark Caribbean Coral (WorldWin)
Ink: ColorBox Silver pigment ink (Clearsnap); Memento Rich Cocoa dye ink (Tsukineko)
Pens: Sketch Markers B32 Pale Blue, E04 Lipstick Natural, E11 Bareley Beigh, YG23 New Leaf, V04 Violet (Copic)
Adhesive: Photo Tape, EZ Squares runner (SCRAPBOOK ADHESIVE by 3L)

Other Stuff:
Ultra-fine clear embossing powder, Gray ultra-fine pen

Here is your Blog Hop info…

27 designers, FIVE shopping sprees each day.  No one knows where the prizes will be!  Each day of the hop, JustRite will have five Mystery Blog Candy Prizes hidden along the hop with a total retail value of $600.  JustRite will randomly select five mystery blogs each day of the hop and randomly allocate each of the shopping sprees. For your chance to win, simply leave a little love (a comment) on each designer’s blog including the JustRite blog.  The more designers you leave comments with, the better your chances of winning.  Each day’s comments will remain open for three days.  A winner from each of the mystery blogs’ comments will be randomly chosen using Random.org. Consult the listing of designers at the JustRite blog each day (each day’s designers will be different) and start out on your way!

Beginning Friday, March 26, summaries of all the winners will be posted on the JustRite blog.  Good luck to everyone and enjoy all the JustRite eye candy along the hop!

Today during the JustRite Mega March Blog Hop (Day One) JustRite and its sponsors will be giving away the following five prizes:

· $200 JustRite Shopping Spree

· $100 Spellbinders Shopping Spree

· $100 Stampers Dream Shopping Spree, and

· Two additional $100 JustRite Shopping Sprees!

Blog comments for Day One will be open until Thursday at 6pm EST.  On Friday, JustRite will announce on their blog which five blogs have the mystery candy for Day One.  You will need to go to the JustRite blog to determine where you need to go to find out if you are one of the five lucky winners.

JustRite Inspiration Blog

Becca Feeken

Tosha Leyendekker

Kazaan Clark

Laurie Schmidlin

Kellie Fortin

Amy Sheffer

Jerri Jimenez (blog is down for a few hours, please check back later)

Michelle Rodgers

Stephanie Kraft

Sally Lynn MacDonald

Cindy Lawrence

Jenyfur Pohl

Silke Ledlow

Carolyn King

Dawn Easton

Holly Simoni

Julie Overby

Karen Maldonado

Colleen Schaan

Kimberly Crawford

Karen Taylor

Maren Benedict

You are here: Frillions by eli, thanks for stopping…

Linda Beeson

Put the layout together by placing the matted photos in an attractive grouping near the center of the page and sprinkle the half circles around to support the feel.

Full of Thanks

28 Nov

Just wanted to give you a link to see my latest layout at the Spellbinders Blog

You have to go over there to see the whole thing…enjoy the rest of your weekend.